1 1/4 CUPS ALL PURPOSE FLOUR
2 TEASPOONS BAKING SODA
2 TEASPOONS BAKING POWDER
1/4 TEASPOONS SALT
1 CUP WATER
1 1/4 CUPS SUGAR
4 OUNCES UNSWEETENED CHOCOLATE, CHOPPED
1 STICK UNSALTED BUTTER, CUT INTO PIECES
2 TEASPOONS VANILLA
2 LARGE EGGS, LIGHTLY BEATEN
FILLING
1 STICK UNSALTED BUTTER, ROOM TEMPERATURE
1 CUP POWDERED SUGAR
1 TEASPOON VANILLA
1 CUP MARSHMALLOW FLUFF
1/2 TEASPOON SALT
GANACHE
6 OUNCES SEMI SWEET CHOCOLATE, CHOPPED
1/2 CUP HEAVY CREAM
POSITION RACK IN CENTER OF OVEN AND PREHEAT TO 350 DEGREES.
SPRAY MUFFIN TINS OR LINE WITH CUPCAKE PAPERS.
BRING THE SUGAR AND WATER TO A BOIL TO DISSOLVE THE SUGAR.
REMOVE FROM HEAT AND ADD THE CHOPPED UNSWEETENED CHOCOLATE AND BUTTER.
LET SIT AND STIR OCCASIONALLY, UNTIL THE CHOCOLATE AND BUTTER ARE MELTED.
ADD THE VANILLA.
SIFT THE DRY INGREDIENTS.
WHISK THE EGGS INTO THE COOLED CHOCOLATE FOLLOWED BY THE DRY INGREDIENTS.
DIVIDE THE BATTER BETWEEN THE PANS AND BAKE FOR 13 – 18 MINUTES OR UNTIL A TOOTHPICK INSERTED IN THE CENTER COMES OUT CLEAN.
COOL.
FOR THE FILLING:
USING A MIXER, CREAM THE BUTTER AND SUGAR UNTIL LIGHT AND FLUFFY.
ADD THE MARSHMALLOW, VANILLA AND SALT.
BEAT UNTIL LIGHT.
FOR THE GANACHE:
BRING THE CREAM TO A BOIL AND POUR OVER THE CHOCOLATE.
LET STAND FOR 5 MINUTES.
STIR UNTIL SMOOTH.
SPOON
THE FILLING INTO A PASTRY BAG WITH A SMALL ROUND TIP; INSERT THE TIP
INTO THE CENTER OF THE BOTTOM OF THE CUPCAKE (TOP OF CUPCAKE IF YOU USED
PAPERS); FILL UNTIL THE CUPCAKE FEELS HEAVIER.
*DO NOT OVERFILL OR THE CUPCAKE WILL CRACK.
SPOON A LITTLE GANACHE ONTO EACH CUPCAKE AND SMOOTH WITH A SPATULA. CHILL.
MELT SOME WHITE CHOCOLATE, SPOON INTO A PAPER CONE OR PLASTIC BAG, CUT THE TIP OFF AND APPLY A SGUIGGLE TO EACH TOP.
STORE IN CONTAINER IN FRIDGE.
HOMEMADE TWINKIES:
1/2 CUP CAKE FLOUR
1/4 CUP ALL-PURPOSE FLOUR
1 TEASPOON BAKING POWDER
1/4 TEASPOON SALT
2 TABLESPOONS WHOLE MILK
4 TABLESPOONS UNSALTED BUTTER
1/2 TEASPOON VANILLA
5 LARGE EGGS, SEPARATED
3/4 CUP SUGAR
1/4 TEASPOON CREAM OF TARTAR
PREHEAT OVEN TO 350 DEGREES AND ADJUST THE OVEN RACK TO THE LOWER MIDDLE POSITION.
GREASE A TWINKIE OR CANOE PAN OR MAKE A TWINKIE MOLD OUT OF HEAVY DUTY FOIL.
WHISK THE FLOURS, BAKING POWDER AND SALT IN A BOWL.
MELT THE BUTTER IN THE MILK AND ADD THE VANILLA. COVER TO KEEP WARM.
PLACE THE EGG WHITES IN THE BOWL OF A STANDARD MIXER BEAT THE WHITES ON MEDIUM HIGH SPEED UNTIL FOAMY.
ADD THE CREAM OF TARTAR AND HALF THE SUGAR AND BEAT UNTIL YOU HAVE SOFT, MOIST PEAKS.
TRANSFER THE WHITES TO A BOWL AND SET ASIDE.
ADD THE YOLKS AND THE REMAINING SUGAR TO THE MIXER BOWL AND BEAT UNTIL THE YOLKS BECONE LIGHT AND THICK (ABOUT 5 MINUTES).
ADD
THE WHITES TO THE BOWL AND SPRINKLE THE FLOY MIXTURE ON TOP OF THE
WHITES. MIX ON LOW SPEED FOR 10 SECONDS AND REMOVE THE BOWL FROM THE
MIXER AND FOLD IN THE MELTED BUTTER UNTIL THE BATTER SHOWS NO TRACE OF
THE FLOUR, YOLKS OR BUTTER.
DIVIDE THE BATTER BETWEEN THE MOLDS AND BAKE UNTIL THE TOPS ARE GOLDEN AND SPRING BACK WHEN TOUCHED, 13 – 15 MINUTES.
COOL IN MOLDS
BEFORE
FILLING, REMOVE THE TWINKIES FROM THE MOLDS. FILL A PASTRY BAG WITH A
SMALL ROUND TIP AND FILL THE TWINKIE IN 3 SPOTS ON THE BOTTOM OF THE
CAKE, JUST LIKE A REAL TWINKIE. THE CAKE WILL FEEL HEAVIER.
*DO NOT OVER FILL OR THE CAKE WILL CRACK.
TWINKIE FILLING:
2 STICKS UNSALTED BUTTER, ROOM TEMPERATURE
2 CUPS POWDERED SUGAR
1 TEASPOON VANILLA
1 CUP MARSHMALLOW FLUFF
1/2 TEASPOON SALT
FOR THE FILLING:
USING A MIXER, CREAM THE BUTTER AND SUGAR UNTIL LIGHT AND FLUFFY.
ADD THE MARSHMALLOW, VANILLA, AND SALT AND BEAT UNTIL LIGHT.
Monday, December 03, 2012
Thursday, November 22, 2012
Thanksgiving
Did you know that different countries in the world celebrate Thanksgiving on different days?
Canada celebrates on the 2nd Monday in October
Liberia celebrates on the 1st Thursday in November
Norfolk Islands celebrate on the last Wednesday in November and
the USA celebrates on the 4th Thursday in November.
Thanksgiving proclamations were made mostly by church leaders in New England up until 1682, and then by both state and church leaders until after the American Revolution. During the revolutionary period, political influences affected the issuance of Thanksgiving proclamations. Various proclamations were made by royal governors, John Hancock, General George Washington, and the Continental Congress, each giving thanks to God for events favorable to their causes. As President of the United States, George Washington proclaimed the first nation-wide thanksgiving celebration in America marking November 26, 1789, "as a day of public thanksgiving and prayer to be observed by acknowledging with grateful hearts the many and signal favours of Almighty God".
Other observances known as Thanksgiving
Germany
The Harvest Thanksgiving Festival (Erntedankfest) is an early October, German festival. The festival has a significant religious component to it but also, like its North American counterpart, includes large harvest dinners (consisting mostly of autumn crops) and parades. The Bavarian beer festival Oktoberfest generally takes place within the vicinity of Erntedankfest.
Grenada
In the West Indian island of Grenada, there is a national holiday known as Thanksgiving Day which is celebrated on October 25. Even though it bears the same name, and is celebrated at roughly the same time as the American and Canadian versions of Thanksgiving, this holiday is unrelated to either of those celebrations. Instead the holiday marks the anniversary of the U.S.-led invasion of the island in 1983, in response to the deposition and execution of Grenadian Prime Minister Maurice Bishop.
Korea
On Thanksgiving Day (Chuseok) is a harvest celebration, which is celebrated according to the lunar calendar, typically in late September, early October. CV
Japan
Labor Thanksgiving Day (勤労感謝の日 Kinrō Kansha no Hi ? ) is a national holiday in Japan. It takes place annually on November 23. The law establishing the holiday, which was adopted during the American occupation after World War II, cites it as an occasion for commemorating labor and production and giving one another thanks. Ithas roots in an ancient harvest ceremony (Niiname-sai (新 嘗祭 ? )) celebrating hard work.
Liberia
In the West African country of Liberia, which beginning in 1820, was colonized by free African Americans (most of whom had been formerly enslaved), Thanksgiving is celebrated on the first Thursday of November.
The Netherlands
Many of the Pilgrims who migrated to the Plymouth Plantation had resided in the city of Leiden from 1609–1620, many of whom had recorded their birth, marriages and deaths at the Pieterskerk.
To commemorate this, a non-denominational Thanksgiving Day service is held each year on the morning of the American Thanksgiving Day in the Pieterskerk, a Gothic church in Leiden, to commemorate the hospitality the Pilgrims received in Leiden on their way to the New World.
Norfolk Island
In the Australian external territory of Norfolk Island, Thanksgiving is celebrated on the last Wednesday of November, similar to the pre-World War II American observance on the last Thursday of the month. This means the Norfolk Island observance is the day before or six days after the United States' observance. The holiday was brought to the island by visiting American whaling ships.
In short, it really only matters what you are thankful for!
Wednesday, October 10, 2012
Make-Your-Own Hollow Chocolate Eggs
Recipe
18 plastic Easter eggsChocolate wafer melts
Oil-based flavors like coffee, vanilla, hazelnut or cinnamon
- Clean 18 plastic eggs in soapy water; rinse and allow them to dry completely.
- Spray inside of eggs with non-stick cooking spray.
- Place 8 oz chocolate wafers into a microwaveable container and heat on high for 45 seconds to 1 minute. Stir and return to microwave for 15 second intervals as needed to melt chocolate. Be careful not to scorch the chocolate.
- Place 1 - 1 1/2 tbsp chocolate into the bottom half of one egg. Close the egg ensuring the two halves are secure.
- Swirl chocolate to coat inside of the egg for 30 seconds until coating has hardened.
- Repeat with remaining eggs.
- Open eggs and carefully release the eggs from the plastic surrounds.
- If desired, you can fill the eggs with your choice of filling (see below for peanut butter and fruit filling recipes). Poke a tiny hole in the bottom of the egg. Fill a resealable plastic bag with filling and snip a tinier hole in the bottom corner of the bag. Place the corner of the bag inside the hole in the egg and squeeze the flavorful filling into the egg. Let the filling set.
- Use a paintbrush to cover the hole in the bottom of the egg.
Thoroughly mix 1 cup confectioner’s sugar, 3/4 cup of creamy peanut butter, 1/4 cup softened unsalted butter and 1/2 tsp vanilla extract. Squeeze into chocolate egg.
Fruit filling
Melt 1 cup of chocolate wafers in the microwave following recipe directions. Beat 8 oz cream cheese until smooth and add the melted chocolate, 1/2 cup of seedless jam and 1 tbsp of matching fruity liqueur. Beat until blended. Squeeze into chocolate egg.
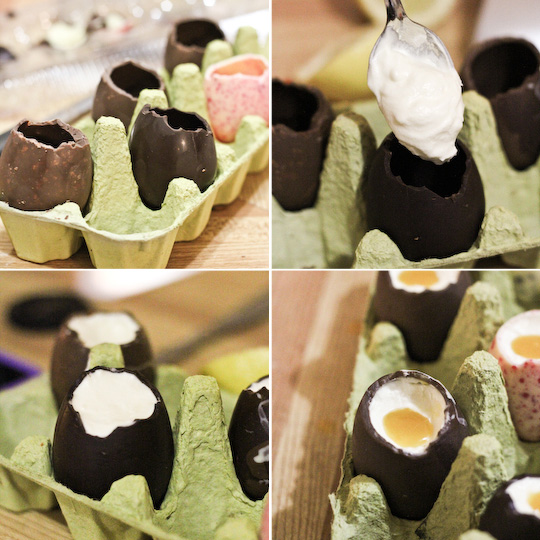
Cheesecake-Filled Chocolate Easter Egg Cups
(Makes 6-8 regular sized Easter egg
cheesecakes, you may need to adjust the amount of cheesecake filling
depending on the size of your eggs)
6-8 hollow chocolate Easter egg shells
5 oz cream cheese, softened
1/4 cup icing sugar (confectioners' sugar), sifted
1/2 tsp lemon juice
1/2 tsp pure vanilla extract
1/2 cup thickened/heavy whipping cream
For the 'yolk': 1 passion fruit, 1 tbsp apricot jam, 1 tbsp (about 15g) unsalted butter (passionfruit juice can be replaced with about 2 tsp of freshly squeezed orange, mandarin juice or mango, peach nectar, you can adjust the amount of juice to taste), alternatively you can substitute with any fruit curd you prefer.
Using a small serrated knife, carefully remove the tops of the chocolate eggs.
Place the eggs in the fridge to keep them chilled while you prepare the cheesecake filling, you can use egg cups or your fridge egg holder.
Place the cream cheese, icing sugar, lemon juice and vanilla in a large mixing bowl and beat on high until the mixture is smooth and fluffy, about 3-4 minutes.
Set aside and carefully whip the thickened cream in a separate mixing bowl to stiff peaks (watch it closely as thickened cream is very easy to over-whip and split).
Using a whisk, gently combine the whipped cream into the cream cheese mixture until it is smooth.
Carefully spoon or pipe the mixture into the prepared chocolate shells. Chill eggs for at least 30 minutes to allow it to set.
Prepare the passion fruit sauce; strain passion fruit pulp to remove the
seeds and place in a small saucepan with the apricot jam and butter.
Gently heat on low, whisking until the butter melts and the mixture is
smooth. Remove from the heat and allow to cool. (If your apricot jam is
chunky you should strain the sauce at this point)
Place in the fridge
and chill until it thickens slightly. Using a small spoon, carefully
scoop out a hole in the centre of each cheesecake, about 1 cm deep and
wide.
Fill hole with some of the chilled passion fruit sauce and return
the eggs to the fridge to chill again for at least 30 mins.
Remove eggs
from the fridge about 10 minutes before serving.
Can be made 2-3 days in
advance, keep eggs in the fridge in a holder inside an airtight
container or covered tightly with clingfilm to stop them drying out.
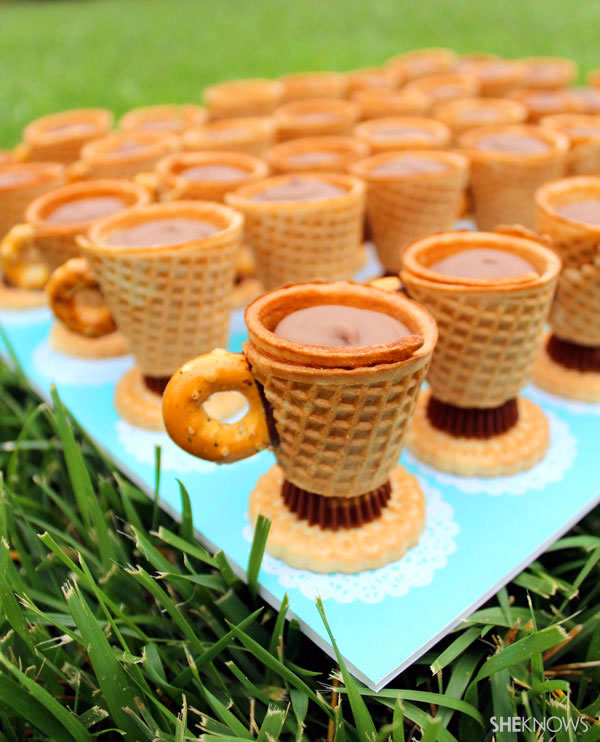
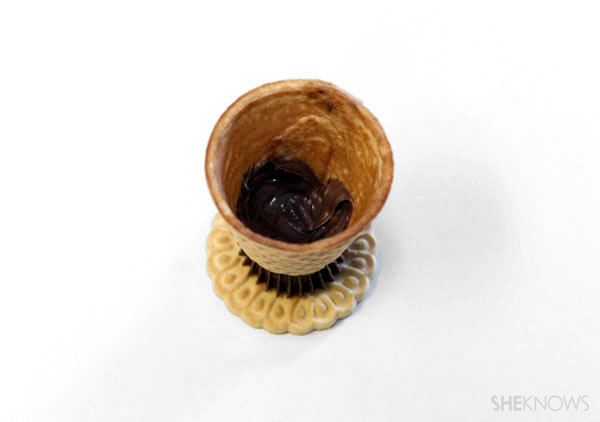
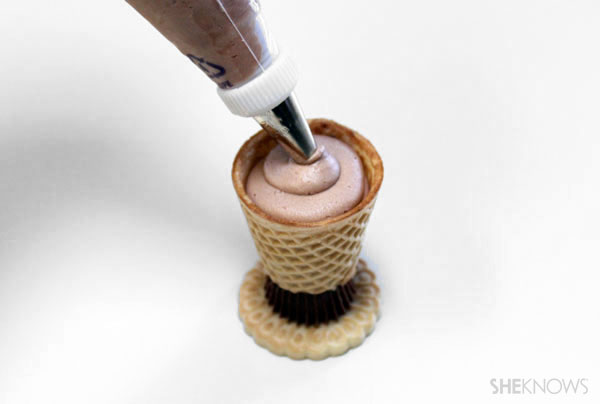
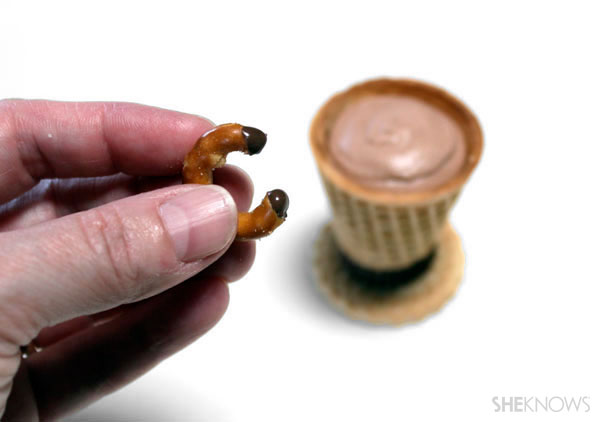
No-Bake, Teacup Treats
 Ingredients:
- Vanilla sandwich cookie wafers
- Reese's Miniature Peanut Butter Cups
- Ice cream sugar cones (top 1-1/2 inch)
- Circle pretzels (found in Chex Mix Sweet 'n Salty Honey Nut mix)
- Chocolate frosting (chocolate pudding, chocolate ganache, etc.)
- Chocolate or vanilla candy melts
Step one
Step two
Step three
Step four
Step five
Step six

Step seven
Step eight
Step nine
Step ten
Ferrero Rocher Cupcakes
- 1 recipe chocolate cupcakes (recipe below)
- 1 13 oz. jar Nutella
- 15 Ferrero Rocher candies
Fill each cupcake with 1 tablespoon of Nutella. Repeat until the Nutella has been evenly divided amongst the cupcakes. Top off each cupcake with a Ferrero Rocher candy, slighting pressing into the Nutella so it stays put.
Store at room temperature in an airtight container.
Makes 15 cupcakes.
Monday, September 24, 2012
Judge not, that ye be not judged.
How many times have we looked at someone and judged them just on what they look like.
Today we went out to eat at a sports bar/grill and some guys were watching the football game, rooting and tooting for their favorite team.
My oldest son said, "Boy, this guy has to be drunk!" I just looked at him and asked him how he came to that conclusion.
Yes, we are in a sports bar/grill but that doesn't mean this guy was drinking!
This man was just a big Raider fan cheering on his team. He got very excited when his team scored. So what's wrong with that?
This made me then think of a TV show (can't remember what it was) I was watching last year. The show was about judging other people based on what they look like and/or wear.
Each audience member wore a different number on his/her shirt and when their number popped up on the screen that person had to tell what they have been judged on all the time.
The TV show host formed a panel of 5 women and men who had to judge 5 other people just based on their appearance and clothing. I don't remember what was said about all 5 people but I still remember to this day how they judged this poor woman because of what she was wearing.
The woman they judged was a Muslim (American) woman with a very beautiful colored head scarf.
Some of the comments were, "If I would sit on an air plane with her, I would call one of the flight attendance and report her as a terrorist. She sure would make me very paranoid being on a plane with her!" "Her hair must be so dirty underneath this scarf!" "I betcha she really smells bad if you get close to her!"
Are people really this paranoid about other people wearing a head scarf? Yes, they are Muslims but no, they are not terrorists. What you see on TV are the bad people and not the majority of their country and/or religious believe.
This poor Muslim woman was in tears after she heard how she was judged. She said that she actually washes her hair every day like everybody else in the USA. She was born here in the USA. She takes a shower every day. She changes her head scarf at least twice a day, if not more than that, depending on her mood and where she was going.
Does it not say in Matthew 7:1-5:
Judge not, that ye be not judged.
2 For with what judgment ye judge, ye shall be judged: and with what measure ye mete, it shall be measured to you again.
3 And why beholdest thou the mote that is in thy brother's eye, but considerest not the beam that is in thine own eye?
4 Or how wilt thou say to thy brother, Let me pull out the mote out of thine eye; and, behold, a beam is in thine own eye?
5 Thou hypocrite, first cast out the beam out of thine own eye; and then shalt thou see clearly to cast out the mote out of thy brother's eye.
So next time you look at a person and judge them just on their appearance, please think twice because this person is most likely not what you think he/she is. This person could turn out to be your best friend, your neighbor, or even the person who may save your life.
Monday, September 17, 2012
Individual Peanut Butter Cheesecake
 Makes 12 cheesecakes
Ingredients
For the Crust:1-1/2c graham cracker crumbs
4T sugar
1/4c butter, melted
couple dashes salt
For the Filling:
2 (8-ounce) packages cream cheese, softened
1c sugar
1t vanilla
1/2c creamy peanut butter
3T flour
2 eggs
Instructions
- Preheat oven to 350. Line a 12-count muffin tin with 12 cupcake cups.
- In a bowl, mix together graham cracker crumbs, melted butter, sugar, and salt until well combined. Using a tablespoon, scoop a heaping tablespoon into the bottom of each cup. Use the rounded back of the tablespoon to press crust down into cup and slightly up the sides. Set aside.
- In the bowl of a stand mixer fitted with the paddle attachment, beat cream cheese and sugar together until smooth, being sure to scrape sides and bottom of bowl. Add vanilla and peanut butter. Beat again until smooth. While mixer is going, sprinkle in the flour, then add the eggs one at a time until creamy and fully incorporated.
- Scoop the peanut butter mixture into a piping bag or gallon-sized plastic zip bag with the tip cut off. Squeeze the mixture into cups, using a circular motion until almost full.
- Bake for 20 minutes or until centers are set. Allow to cool to room temperature on a cooling rack. Serve at room temperature or refrigerate and serve later.

Saturday, September 15, 2012
- Prep time: 10 minutes
- Cook time: 30 minutes
- Serves: 24 Muffins

Ingredients
- 1 pound Bob Evans Original Recipe Sausage Roll – cooked and crumbled
- 1 package Bob Evans Refrigerated Hash Brown Potatoes (20 oz)
- 4 large eggs
- 1/2 cup milk
- 3 tablespoons butter, melted
- 1 cup ham, cubed
- 1/2 teaspoon black pepper
- 1/2 cup bell peppers, diced
- 1 cup shredded cheddar cheese
Directions
Preheat oven to 350F. Lightly grease a twelve cup
muffin tin. In a bowl whisk together eggs and milk. Add remaining
ingredients and mix thoroughly. Fill muffin tins 2/3 full. Bake for
27-30 minutes or until a toothpick or knife inserted in the center comes
out clean.
Weekend Brunch Casserole

- Prep time: 15 minutes
- Cook time: 15 minutes
- Serves: Makes 8 servings
This easy breakfast is a great way
to start the day. Sausage, eggs and cheese are layered over a crescent
roll base for a delicious and filling meal.
Ingredients
- 1 pound Bob Evans Original Recipe Sausage Roll
- 2 cups shredded mozzarella cheese
- 1 can refrigerated crescent dinner rolls (8 oz)
- 4 large eggs, beaten
- 3/4 cup milk
- 1/4 teaspoon salt
- 1/8 teaspoon black pepper
Directions
Preheat oven to 425F. Crumble and cook sausage in
skillet over medium heat until browned. Drain sausage. Line bottom of
greased 13 x 9 inch baking dish with crescent roll dough, firmly
pressing perforations to seal. Sprinkle with sausage and cheese. Combine
remaining ingredients in medium bowl until blended, pour over sausage.
Bake 15 minutes or until set. Let stand 5 minutes before cutting into
squares; serve hot. Refrigerate leftovers.
BBQ Quesadilla
- Prep time: 15 minutes
- Cook time: 20 minutes
- Serves: Makes 6 servings

Bob Evans Zesty Hot Sausage and award-winning Wildfire Sauce put a spicy twist on this favorite starter.
Ingredients
- 1 pound Bob Evans Zesty Hot Sausage
- 1/2 cup Bob Evans Wildfire BBQ sauce
- 1/2 cup thinly sliced red onion
- 4 whole flour tortillas (10 inch)
- 1 cup shredded Monterey Jack Cheese (4 oz)
- 1 container sour cream
- 1 jar Salsa
Directions
In skillet over medium heat, crumble and cook
sausage and onions until brown. Stir in BBQ sauce. Lay 2 of the
tortillas on a flat surface. Top each with 1/4 cup cheese. Divide
sausage mixture between the two. Sprinkle each with 1/4 cup cheese. Top
with remaining tortillas. Heat large skillet over medium heat. Add a
small amount of oil to coat bottom of skillet. Cook one quesadilla at a
time until golden grown on each side, about 2-3 minutes per side. Cut
into wedges and serve with sour cream and salsa.
Mocha Frappuccino Recipe (Starbuck's)
Can you tell I really like Starbuck's "coffee". Just can't afford it so why not make your own!?!
 Ingredients
4 shots espresso
1 cup milk
2 cups ice
1/4 cup sugar
3 tablespoons chocolate syrup, plus more for topping
whipped cream (fresh or from a can)
For a weaker Frappuccino, use 2 shots espresso, 1 1/2 cups milk and (about half the amount of sugar) 2 tablespoons
Method
1. Add warm espresso and sugar to blender. Blend until combined. Add milk, ice and chocolate syrup. Blend on high until ice is fine.
2. Serve topped with whipped cream and chocolate syrup.
Make 4 regular sized frappuccinos or 2 giant (grande) ones
Ingredients4 shots espresso
1 cup milk
2 cups ice
1/4 cup sugar
3 tablespoons chocolate syrup, plus more for topping
whipped cream (fresh or from a can)
For a weaker Frappuccino, use 2 shots espresso, 1 1/2 cups milk and (about half the amount of sugar) 2 tablespoons
Method
1. Add warm espresso and sugar to blender. Blend until combined. Add milk, ice and chocolate syrup. Blend on high until ice is fine.
2. Serve topped with whipped cream and chocolate syrup.
Make 4 regular sized frappuccinos or 2 giant (grande) ones
Homemade Reese’s Peanut Butter Cup Eggs
Excuse my drooling over this recipe!
 1 cup confectioners’ sugar
8 tablespoons crunchy peanut butter (smooth is fine, too)
2 tablespoons unsalted butter, room temperature
1 teaspoon vanilla extract
1 pinch kosher salt
1/2 cup chocolate chips
1. In a large bowl mix the peanut butter, butter, vanilla, and salt with a wooden spoon until well combined. Then add the confectioners’ sugar and stir it well until is completely incorporated with the peanut butter mixture.
2. Use your hands to roll the peanut butter into egg-like oval shapes that are 1/4 inch thick and chill them on a plate in the fridge for about 1 hour.
3. In the microwave melt the chocolate chips until they are completely smooth. Remove the peanut butter balls from the fridge and dip each one into the melted chocolate until they are completely coated. Line a plate with wax paper and allow the chocolate to cool and harden before eating.
1 cup confectioners’ sugar8 tablespoons crunchy peanut butter (smooth is fine, too)
2 tablespoons unsalted butter, room temperature
1 teaspoon vanilla extract
1 pinch kosher salt
1/2 cup chocolate chips
1. In a large bowl mix the peanut butter, butter, vanilla, and salt with a wooden spoon until well combined. Then add the confectioners’ sugar and stir it well until is completely incorporated with the peanut butter mixture.
2. Use your hands to roll the peanut butter into egg-like oval shapes that are 1/4 inch thick and chill them on a plate in the fridge for about 1 hour.
3. In the microwave melt the chocolate chips until they are completely smooth. Remove the peanut butter balls from the fridge and dip each one into the melted chocolate until they are completely coated. Line a plate with wax paper and allow the chocolate to cool and harden before eating.
Caramel Macchiato Recipe (Starbuck's)
") Ingredients
Ingredients2 tablespoons vanilla syrup (recipe follows)
1/2 cup fresh espresso
1 cup milk, steamed and frothy with foam
3 – 4 tablespoons caramel sauce (I used the same jarred caramel sauce that is sold as an ice cream topping)
For the Vanilla syrup:
2 cups water
1 1/2 cups granulated sugar
1 teaspoon vanilla extract
Method
1. To make the vanilla syrup, combine sugar and water in a sauce pan. Bring to boil over high heat and boil for 5 minutes. Let cool and add vanilla extract. Stir well and keep in a sealed container, refrigerated.
2. To make coffee, either use an espresso machine to make coffee and steam milk, or heat milk until hot, but not boiling on stove-top and transfer to a blender. Blend until frothy. For espresso, if you don’t have a machine, just make double strength coffee.
3. Add vanilla syrup, espresso or strong coffee and hot milk to mug. Add caramel sauce and serve.
DIY Stuffed Crust Pizza
 If you really want to impress your kids, make stuffed crust pizza at
home, in your own kitchen. It’s easy to do using part-skim mozzarella
cheese sticks or your own meltable cheese, cut into strips. And it’s
exactly the sort of thing that makes anyone under 10 regard you as a
superhero. Bonus: you don’t have to rely on take-out, and can control
what goes into and on top of pizza you make at home.
If you really want to impress your kids, make stuffed crust pizza at
home, in your own kitchen. It’s easy to do using part-skim mozzarella
cheese sticks or your own meltable cheese, cut into strips. And it’s
exactly the sort of thing that makes anyone under 10 regard you as a
superhero. Bonus: you don’t have to rely on take-out, and can control
what goes into and on top of pizza you make at home.You don’t need a recipe so much as the technique – start with any kind of raw pizza dough. Roll it out as you normally would, rolling the circle or oval completely flat. Take a package of cheese sticks or strings – or cut regular mozzarella into sticks – and place them around the edge of the dough. Roll the edge of dough over the cheese, enclosing it, and pinch to seal. Proceed with the sauce, toppings and cheese and bake as you normally would. As it bakes (pizza is typically baked in a hot oven – about 450°F), the cheese will melt inside the crust, and Viola – stuffed crust pizza.
Basic Pizza Dough
1 cup lukewarm water
1 pkg. (or 2 tsp.) active dry yeast
1 tsp. sugar or honey
2 1/2 – 3 cups flour – all purpose, whole wheat, or any combination of the two
1 tsp. salt
1 Tbsp. olive oil
In a large bowl, stir together the water, yeast and sugar; set aside for 5 minutes, until it’s foamy. (If it doesn’t get foamy, either your water was too hot and killed the yeast or it was inactive to begin with – toss it and buy fresh yeast or try again!)
Add 2 1/2 cups of the flour, salt and oil and stir until the dough comes together. On a lightly floured surface, knead the dough for about 8 minutes, until it’s smooth and elastic, adding a little more flour if the dough is too sticky.
Place the dough in an oiled bowl and turn to coat all over. Cover with a tea towel or plastic wrap and set aside in a warm place for half an hour to an hour, until doubled in bulk. If you want you can let it rise more slowly in the refrigerator for up to 8 hours.
Roll the dough out into one or two pizzas. Spread the pizza dough with tomato sauce or paste, sprinkle with desired toppings and bake on a preheated pizza stone or cookie sheet at 450F for 15-20 minutes, until bubbly and golden, or cook on the grill (see above).
Makes enough dough for 2 – 9” pizzas, or one big rectangular one.
Pumpkin Spice Latte (Starbuck’s Copycat)
Who doesn't like Starbuck's? I know I don't drink there very often because it's a little more than I would like to spend on a cup of coffee; therefore, Starbuck's is a really rare treat for me.
Well, not anymore; check out this yummy recipe!
") Ingredients
Ingredients
2 cups half and half, whole milk reduced fat or skim milk
2 tablespoons canned pumpkin puree
1 – 2 tablespoons sugar, stevia or splenda
2 tablespoons vanilla extract, yes tablespoons
1/2 teaspoon pumpkin pie spice
1-4 shots espresso or very strong coffee (I double the amount of grounds I use per cup to get my strong coffee)
Method
1. Brew your espresso or strong coffee. If brewing strong coffee, use double the amount of grounds you would in your regular coffee.
2. Combine half and half or milk, pumpkin, sugar, and pumpkin pie spices in a small saucepan. Heat until very hot, but do not boil. Remove from heat and add vanilla. Transfer to a blender or a milk frother and blend until frothy.
3. Pour 1 cup warm pumpkin milk mixture into coffee mug and add 1-4 coffee shots. Dust with more pumpkin pie spice if desired.
Makes about 1 – 2 servings.
Well, not anymore; check out this yummy recipe!
Ingredients2 cups half and half, whole milk reduced fat or skim milk
2 tablespoons canned pumpkin puree
1 – 2 tablespoons sugar, stevia or splenda
2 tablespoons vanilla extract, yes tablespoons
1/2 teaspoon pumpkin pie spice
1-4 shots espresso or very strong coffee (I double the amount of grounds I use per cup to get my strong coffee)
Method
1. Brew your espresso or strong coffee. If brewing strong coffee, use double the amount of grounds you would in your regular coffee.
2. Combine half and half or milk, pumpkin, sugar, and pumpkin pie spices in a small saucepan. Heat until very hot, but do not boil. Remove from heat and add vanilla. Transfer to a blender or a milk frother and blend until frothy.
3. Pour 1 cup warm pumpkin milk mixture into coffee mug and add 1-4 coffee shots. Dust with more pumpkin pie spice if desired.
Makes about 1 – 2 servings.
Pizza Baked Potatoes
 3 large potatoes
1 can spaghetti sauce
2 cups mozzarella cheese
Pepperoni
Microwave potatoes until tender, about 12-15 minutes.
Slice the potatoes in half lengthwise, scoop a small well into the center of the potato, sprinkle lightly with salt, then scoop a bit of spaghetti sauce on top of the potato.
Sprinkle some cheese on top of the sauce.
Place a few pepperoni on top of the cheese, then transfer to a cookie sheet.
Bake in an oven preheated to 400 degrees for about 15 minutes, or until the cheese is melted and bubbly.
Allow to cool slightly before serving.
Apple Fries
Kids will love preparing the ‘fries’ and coating the chicken. Serve in rolled newspaper for an authentic ‘fish & chips’ feel.

2 cups apple cider
2 Tbsp. butter
1 tsp. coarse salt (optional)
4 tart but firm apples, peeled, cored and cut into 8 wedges (per apple)
1 Tbsp. chopped fresh thyme
Crispy Chicken Fingers:
1 cup crushed corn flakes (or crushed whole grain flakes)
1/2 tsp. salt (optional)
2 Tbsp. chopped fresh parsley
1 lb. chicken breasts, sliced into strips
2 Tbsp. sweet chili sauce (or buttermilk-enough to dip in)
In large saucepan over medium-high heat, boil cider until reduced to 1/3 cup, about 20 minutes (it should have a syrupy consistency). Remove from heat and whisk in butter and salt.
Preheat oven to 400 F. In bowl, toss apples with 2 Tbsp. of the glaze and 1/2 Tbsp. thyme. Arrange in a single layer on a rimmed baking sheet. Set aside.
In bowl combine corn flake crumbs, salt and parsley. Set aside. Dip chicken strips in sweet chili sauce and then coat with corn flakes. Arrange in a single layer on a greased baking sheet.
Place chicken on the top third and the apples on the bottom third of the oven. Roast for 10 minutes. Turn chicken, drizzle apples with remaining glaze and switch baking sheets so the apples are now on the top third of oven. Continue to roast for 10 minutes and remove chicken from oven. Let chicken fingers cool while apples finish caramelizing, about 5 to 10 minutes more.
Sprinkle apples with remaining thyme and additional salt if desired.
Makes 6 servings.
Per serving: about 220 cal, 18 g pro, 5 g total fat (2 g sat. fat), 25 g carb, 2 g fibre, 55 mg chol, 780 mg sodium. %RDI: iron 10%, calcium 2%, vit A 8%, vit C 15%
“Sushi” Sandwich
I call this an easy "Sushi" recipe, which your kids will love to help you make (and eat).
 Makes 8 pieces “sushi,” serving one
What you’ll need:
One 3-ounce can solid white tuna packed in water
1 tablespoon low fat mayonnaise
1 teaspoon fresh lemon juice
2 slices white or whole wheat bread
Two 4-inch long x 1/4 inch wide carrot sticks (or 1 tablespoon coarsely shredded carrot)
What to do:
1. Drain tuna and mash with a fork. Stir in mayonnaise and lemon juice.
2. Trim crusts from bread and roll out bread using a rolling pin until it is flattened to about 1/16 inch. Spoon one half of the tuna in a log down the middle of each slice of bread, arrange a carrot stick or half of the shredded carrot in the middle of the tuna and roll up the bread tightly to enclose the filling.
3. Cut each roll crosswise into 4 pieces and arrange cut side up in one layer in a container. Cover tightly.
Variation: Spread a little mayonnaise or mustard on the bread. Stack a thin slice of turkey and a thin slice of Swiss cheese on a work surface; place a thin strip of pickle or red bell pepper at one end of the stack and roll the ham and cheese around the pickle. Place the roll on the bread; roll up and proceed as above.
Makes 8 pieces “sushi,” serving oneWhat you’ll need:
One 3-ounce can solid white tuna packed in water
1 tablespoon low fat mayonnaise
1 teaspoon fresh lemon juice
2 slices white or whole wheat bread
Two 4-inch long x 1/4 inch wide carrot sticks (or 1 tablespoon coarsely shredded carrot)
What to do:
1. Drain tuna and mash with a fork. Stir in mayonnaise and lemon juice.
2. Trim crusts from bread and roll out bread using a rolling pin until it is flattened to about 1/16 inch. Spoon one half of the tuna in a log down the middle of each slice of bread, arrange a carrot stick or half of the shredded carrot in the middle of the tuna and roll up the bread tightly to enclose the filling.
3. Cut each roll crosswise into 4 pieces and arrange cut side up in one layer in a container. Cover tightly.
Variation: Spread a little mayonnaise or mustard on the bread. Stack a thin slice of turkey and a thin slice of Swiss cheese on a work surface; place a thin strip of pickle or red bell pepper at one end of the stack and roll the ham and cheese around the pickle. Place the roll on the bread; roll up and proceed as above.
Italian Sausage and Peppers Pizza
Ingredients - For the crust
1 1/2 cups warm water
2 1/2 teaspoons yeast
1 tablespoon honey
1/4 teaspoon onion powder
1/4 teaspoon garlic powder
1 teaspoon kosher salt
3 – 4 cups flour
3 tablespoons olive oil
For the Sauce
1 – 6 oz can tomato paste, I like Cento brand
1 cup water
1/2 teaspoon Italian Blend dried seasonings (oregano, basil, marjoram, thyme, rosemary, savory, and sage) (Or 1 1/2 teaspoons fresh)
1/4 teaspoon garlic powder
1/4 teaspoon onion powder
a little pinch of red pepper flake, optional
For the Toppings
1/2 green bell pepper, sliced
1/2 red bell pepper, sliced
1/2 yellow bell pepper, sliced
1/2 sweet yellow onion, sliced
1 lb ground Italian sausage, browned
about 2 cups Italian blend shredded cheese
1 cup torn fresh basil leaves
Method
1. Combine warm water, yeast, honey, salt, onion and garlic powder in your stand mixer. Mix until yeast dissolves. Turn mixer to low and add flour until dough starts to pull away from bowl. Knead for about 10 minutes. Dough should be sticky. Grease a large metal bowl with olive oil. Form dough into a ball and transfer to bowl. Cover with plastic wrap and a towel. Let rise about 2 hours in a warm place. Punch down, from into a ball again and let rise again until it doubles in size.
2. Brown ground Italian sausage. Combine all ingredients for sauce and bring to a boil. Reduce to a simmer and stir occasionally until ready to use. Preheat oven to highest temperature, mine is 550 degrees. Spread pizza dough onto a stone or pan. Dough will make one thick crust, or 2 thinner crusts. Pre-bake crust in a 550 degree oven until lightly browned. Remove from oven.
3. Add sauce on top of pizza. Add a big handful of cheese, fresh basil, and all other toppings, ending with the cheese.
4. Bake pizza at oven’s highest temperature (mine is 550 degrees) until golden brown.
Football Peperoni Pizza
If you like football or not, this is just one yummy looking pizza!
 Ingredients
1 pizza dough or pre-made crust
pizza sauce
shredded mozzarella cheese
pepperoni
sliced white cheese, cut in strips (I used Swiss cheese)
Instructions
Preheat oven to 450 degrees. If using fresh pizza dough, bring to room temperature.
Spread dough over, or place pizza crust in pizza pan.
Add pizza sauce and then cheese.
Top with pepperoni, laying it slightly overlapping in the shape of a football.
Place Swiss cheese strips in the middle of your peperoni football to form the laces.
Bake according to pizza dough instructions, or until pizza is lightly browned and cheese has melted.
Ingredients1 pizza dough or pre-made crust
pizza sauce
shredded mozzarella cheese
pepperoni
sliced white cheese, cut in strips (I used Swiss cheese)
Instructions
Preheat oven to 450 degrees. If using fresh pizza dough, bring to room temperature.
Spread dough over, or place pizza crust in pizza pan.
Add pizza sauce and then cheese.
Top with pepperoni, laying it slightly overlapping in the shape of a football.
Place Swiss cheese strips in the middle of your peperoni football to form the laces.
Bake according to pizza dough instructions, or until pizza is lightly browned and cheese has melted.
Broccoli Cheddar Quiche
 A perfect, delicious vegetarian quiche.
Ingredients
1/2 cup shredded cheddar cheese
1 1/2 cups half and half cream
3 large eggs
1/8 tsp pepper
1/2 cup broccoli
1 crust, single 9" pie crust
1/8 tsp pepper
1/2 cup broccoli
1 crust, single 9" pie crust
Directions
Preheat oven to 375° F (180° C).
Preheat oven to 375° F (180° C).
For the pie shell prick the bottom of a 9" pie shell and bake for approximately 10 minutes. Remove from oven.
In pie shell layer cheddar cheese and broccoli, ending with cheese.
Sprinkle with pepper.
Combine eggs and half and half and pour over eggs and broccoli.
Bake until golden brown, until a silver knife inserted 1" from the edge of crust comes out clean.
Cook time: 30 minutes
Credit and a BIG "THANK YOU" goes to Pampered Chef with Nichole Garzone who let me copy this recipe. ♥
Friday, September 14, 2012
German black forest cake

Ingredients:
2 1/8 cups all-purpose flour
2 cups white sugar
3/4 cup unsweetened cocoa powder
1 1/2 teaspoons baking powder
3/4 teaspoon baking soda
3/4 teaspoon salt
3 eggs
1 cup milk
|
1/2 cup vegetable oil
1 tablespoon vanilla extract
2 (20 ounce) cans pitted sour cherries
1 cup white sugar
1/4 cup cornstarch
1 teaspoon vanilla extract
3 cups heavy whipping cream
1/3 cup confectioners' sugar
|
Directions:
| 1. | Preheat oven to 350 degrees F (175 degrees C). Grease and flour two 9 inch, round, cake pans; cover bottoms with waxed paper. |
| 2. | In a large bowl, combine flour, 2 cups sugar, cocoa, baking powder, baking soda, and salt. Add eggs, milk, oil, and 1 tablespoon vanilla; beat until well blended. Pour batter into prepared pans. |
| 3. | Bake for 35 minutes, or until wooden toothpick inserted in centers comes out clean. Cool layers in pans on wire racks 10 minutes. Loosen edges, and remove to racks to cool completely. |
| 4. | Drain cherries, reserving 1/2 cup juice. Combine reserved juice, cherries, 1 cup sugar and cornstarch in a 2 quart saucepan. Cook over low heat until thickened, stirring constantly. Stir in 1 teaspoon vanilla. Cool before using. |
| 5. | Combine whipping cream and confectioner's sugar in a chilled medium bowl. Beat with an electric mixer at high speed until stiff peaks form. |
| 6. | With long serrated knife, split each cake layer horizontally in half. Tear one split layer into crumbs; set aside. Reserve 1 1/2 cups Frosting for decorating cake; set aside. Gently brush loose crumbs off top and side of each cake layer with pasty brush or hands. To assemble, place one cake layer on cake plate. Spread with 1 cup frosting; top with 3/4 cup cherry topping. Top with second cake layer; repeat layers of frosting and cherry topping. Top with third cake layer. Frost side of cake. Pat reserved crumbs onto frosting on side of cake. Spoon reserved frosting into pastry bag fitted with star decorator tip. Pipe around top and bottom edges of cake. Spoon remaining cherry topping onto top of cake. |
Marble Cake or Marmorkuchen
The marble cake is one of these typical cake recipes for the traditional
“coffee and cake” getting together on Sunday afternoons. German
families and friends like to meet Sunday afternoon to enjoy a cup of
coffee and some cake. They come together in their homes, or meet in
Cafes which are open Sundays, especially on the country side or ins mall
cities. It is a delicious cake because it was never too
dry or too mushy. I think nobody in Germany can imagine a Sunday without
a cake – share the sweet cake moments and bake it yourself.
Ingredients Marble Cake
250 gr butter
200 gr sugar
500 gr flour
1 sachet vanilla sugar
1 sachet backing powder
1 pinch salt
4 eggs
1 cup milk
For the dark part:
30 gr cocoa
3 tbsp water
3 tbsp sugar
Cooking Instructions Marble Cake
- place butter with sugar, salt and vanilla sugar in a bowl and stir it until foamy
- add one egg after the other slowly into the dough and mix it
- mix flour and baking powder, then add flour and milk alternating to the dough
- grease a baking form with butter and pour half of the dough into
Make the dark part of the cake:
- mix water, sugar and cocoa and bring it to a short boil
- let it cool off a bit
- pour it into the form and with a fork mix the 2 parts together in order to get the typical marble patter.
Pre-heat oven to 350 F, bake the cake on the lowest level for about 60 minutes.
Test to see if the cake is done: Take a knitting needle or a fork and stick it into the cake. If no dough will stick on the metal the cake is done.
Take the cake out of the oven, let it cool off a bit, then get it carefully out of the form.
TIP
If the dough won’t be light and fluffy add some small amount of mineral water which will make it very fluffy.
Thursday, September 13, 2012
Quick DIY Thanksgiving Place Cards
Take a pine cone, spray paint on a little glitter (or leave it plain if you'd rather) and make up a place card using card stock.
Use a pen or computer to print names on the cards and slip between pieces of the pine cone.
The photo at right is from Better Homes and Gardens.
Scented Pinecones
I love the smell of cinnamon. It always reminds me of the holidays.
And cinnamon scented pinecones make the whole house smell fabulous.
You’ve probably seen them in the local craft stores, sold along with
the scented brooms.
So why pay for scented pinecones, when I can make my own? With having a huge pine tree in my front yard, I found a nice selection of them and made my own baskets of scented pinecones!
 For this project I used:
Pinecones
Essential Oil- Cinnamon
A spray bottle
Cinnamon Sticks
Basket
Assorted Ornaments
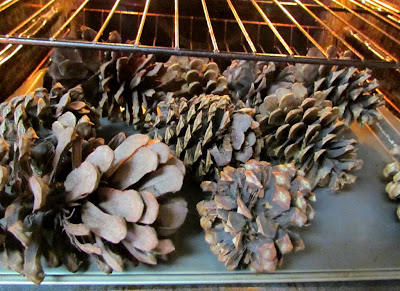 Once you have chosen your pinecones, you would need to wash them in
the sink and then place them on a cookie sheet and put them in a 200
degree oven for an hour. This not only cleans them up, but dries them
out and opens them up completely. Be sure to keep a close eye on them
while in the oven for safety.
Once you have chosen your pinecones, you would need to wash them in
the sink and then place them on a cookie sheet and put them in a 200
degree oven for an hour. This not only cleans them up, but dries them
out and opens them up completely. Be sure to keep a close eye on them
while in the oven for safety.
 Then add your essential oil to a spray bottle and spray the pinecones
thoroughly. (You can find essential oils at most craft stores. They
are relatively inexpensive and come in all sorts of scents!)
Then add your essential oil to a spray bottle and spray the pinecones
thoroughly. (You can find essential oils at most craft stores. They
are relatively inexpensive and come in all sorts of scents!)
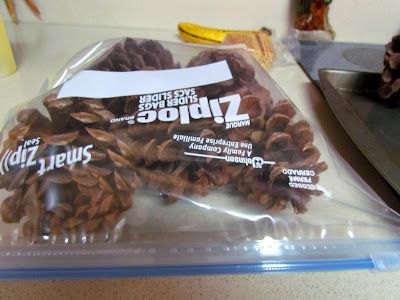 Place your pinecones inside ziplock bags and let them sit for 24
hours. Then pull them out and allow them to air dry. They will smell
wonderful!
Place your pinecones inside ziplock bags and let them sit for 24
hours. Then pull them out and allow them to air dry. They will smell
wonderful!
Pinecones make wonderful decorations and centerpieces for the
holidays. I like to pile them into a basket, and add an assortment of
ornaments and cinnnamon sticks for a festive look. A simple,
inexpensive centerpiece that will make your room smell like the
holidays.
So why pay for scented pinecones, when I can make my own? With having a huge pine tree in my front yard, I found a nice selection of them and made my own baskets of scented pinecones!
 For this project I used:
Pinecones
Essential Oil- Cinnamon
A spray bottle
Cinnamon Sticks
Basket
Assorted Ornaments
Pinecone Picture-Frame Ornaments
Tools and Materials (Martha Stewart Craft)
- Pinecones
- Family photos
- Small floral clippers
- Craft glue
- Card stock
- Pencil
- Circle template (make yourself or buy at a crafts store)
- Decorative paper
- Ribbon
-
 Photos displayed in pinecone frames demand a closer look; when hung on the tree, each ornament, like a page in a scrapbook, tells a story. A single ornament -- or a set -- makes a lovely keepsake to share with family members.
 -

Step 1
Remove pinecone scales with small floral clippers. -

Step 2
Glue a photograph or photocopy of a picture onto card stock. Using a template for a circle or other shape (you can make it yourself or buy one at a crafts store), outline the shape onto your photograph with a pencil; cut out. Hot-glue pinecone scales around perimeter at the back of the cutout, so the scales peek from behind the edge. Alternatively, you can glue scales onto the front of the cutout photograph. Finish the ornament with decorative paper glued to the back with a few dots of craft glue. Glue a looped length of ribbon between backing paper and photo to make a hanger.
Pinecone Craft - Bird Feeder
We have this huge pine tree in our front yard, which drops tons and tons of pine cones (and useless needles). Every year I want to do something with the pine cones but most of the time they just waste in my yard because I just can't come up with a project.
Last year we made a few bird feeders with them.
 Ingredients:
Pine cones
Peanut butter
Birdseed
Plastic storage bag with seal
Plastic Spoon
Newspaper (something to cover your work area)
Ribbon/String
Scissors
Directions:
Take the plastic spoon and dip it into the peanut butter.
Spread the peanut butter all over the pine cone
Pour birdseed into the plastic storage bag and drop pine cone into it.
Seal the bag and shake until the pine cone is all covered with bird seed.
Partially pull out the pine cone out of the bag and shake off loose seeds.
Tie a ribbon/string on the end of the pine cone so you can hang it outside.
Voila, you have a bird feed.
Last year we made a few bird feeders with them.
Ingredients:Pine cones
Peanut butter
Birdseed
Plastic storage bag with seal
Plastic Spoon
Newspaper (something to cover your work area)
Ribbon/String
Scissors
Directions:
Take the plastic spoon and dip it into the peanut butter.
Spread the peanut butter all over the pine cone
Pour birdseed into the plastic storage bag and drop pine cone into it.
Seal the bag and shake until the pine cone is all covered with bird seed.
Partially pull out the pine cone out of the bag and shake off loose seeds.
Tie a ribbon/string on the end of the pine cone so you can hang it outside.
Voila, you have a bird feed.
Ultimate Slow Cooker Potatoes

3
cups boiling water
1 1/2
cups milk
1/2
cup butter or margarine, cut into pieces
1/2
cup sour cream
1
package (8 oz) cream cheese, cut into cubes
1
teaspoon garlic salt
1/4
teaspoon pepper
3
cups Betty Crocker® Potato Buds® mashed potatoes (dry)
Gravy or chopped fresh parsley, if desired
- Spray 3- to 4-quart slow cooker with cooking spray. In cooker, mix boiling water, milk, butter, sour cream and cream cheese with whisk until blended. Add garlic salt, pepper and dry potatoes; mix just until blended.
- Cover; cook on Low heat setting 1 hour 30 minutes, stirring once after 1 hour.
- Before serving, stir potatoes. Serve immediately, or hold in slow cooker on Low heat setting up to 3 hours, stirring every 30 minutes. If potatoes become too thick, stir in additional milk, about 2 tablespoons at a time. Serve with gravy or sprinkle with chopped parsley.
Makes
12 servings (2/3 cup each)
Special Touch: Add
your own special touch to delicious potatoes. Sprinkle with chopped
fresh chives, canned French-fried onions or fresh grated Parmesan
cheese.
Make Tonight Taco Night
Taco in a Bag (from Betty Crocker)
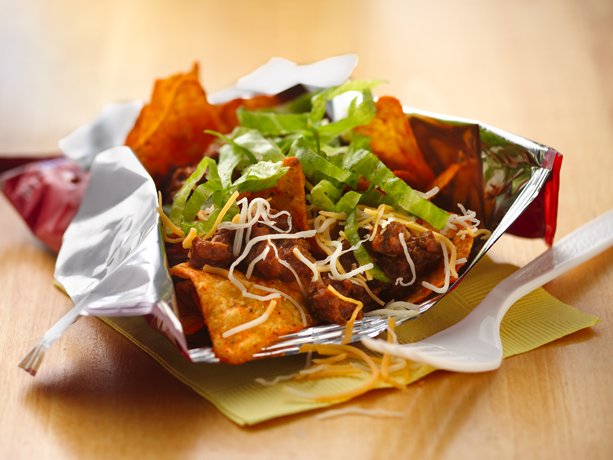
Need a fun snack or light meal idea?
Enjoy these 5-minute Mexican-style micro waved ground beef and cheese
blend topped nacho-flavored tortilla chips.
Prep Tim: 5 Minutes Total Time: 5 Minutes
Makes 1
taco
1/4
cup refrigerated taco sauce with seasoned ground beef from 18-oz container)
1
bag (1 oz) nacho-flavored tortilla chips
2
tablespoons finely shredded Mexican cheese blend
2
tablespoons shredded lettuce
- In small microwavable bowl, microwave ground beef on High 30 seconds or until thoroughly heated. Squeeze bag of chips to crush slightly.
- Cut bag of chips open along top; hold open. Top chips with warm ground beef; mix with fork. Top with cheese, lettuce and if desired, other taco toppings. Eat directly from bag.
Schnitzel
One of the questions I hear a lot is, "What is Schnitzel"?
Schnitzel is boneless meat, pounded thin, coated in breadcrumbs and fried.
If you can afford it, the best Schnitzel is made from veal; however, it's lesser cousin, the pork chop works just fine.
Ingredients:
Thin cut pork chop
Salt and Pepper for tasting
Egg
Breadcrumbs
Oil
Directions:
Pound your pork chops really thin
Break the egg onto a plate or coating tray
Add salt and pepper for flavor
Pour breadcrumbs onto a separate plate
In a deep frying pan, heat oil (about 1 to 2 inches - you want enough to cover the pork chops).
Coat one pork chop at the time at first with the egg and then with breadcrumbs.
Once your oil is nice and hot, carefully place the pork chop in it. Let it fry for 5 minutes on each side (until fully cooked).
Once your pork chops are fully cook, place them on a paper towel to get rid of the excess oil.
You can fix whatever side dish you like with it. Spätzle are really great as a side dish.
Wednesday, September 12, 2012
Spätzle
What is Spätzle? Spätzle is a German pasta and it is the easiest food ever to make...kinda like your dumplings. Simple ingredients but oh so delicious!
Ingredients
- 2 eggs
- 2 tablespoons freshly rendered lard or 2 tablespoons oil
- 1/2 cup water
- 1/2 cup milk
- 2 1/2 cups all-purpose flour
- 2 1/2 teaspoons salt
- 1/4 teaspoon baking powder
- 4 quarts water
- Optional: For extra flavor, add 1/4 teaspoon of nutmeg
Directions
- Using an electric mixer, blend the eggs, lard or oil, water and milk.
- Stir the flour together with 1/2 tsp of the salt and the baking powder in a dry bowl.
- Blend this mixture into the liquid.
- Mix well and set aside for a moment. Bring 4 quarts of water to a boil and add 2 tsp of salt. You can either use a Spätzle maker (if you have one) or just drop batter by 1/2 teaspoonfuls into boiling liquid (pinching off pieces will work also...just depending on how big you want it to be).
- Use about 1/3 of the dough for each batch.
- When the dumplings float to the surface, they are done. Remove them with a slotted spoon and place in a colander.
- They can be served with way with paprika gravy or pan fried with a little butter, just until they are a bit golden, and topped with parsley.
- Note: These dumplings can also be made by using piping bag or dropping very small amounts from a spoon.
- The latter takes much longer.
Oktoberfest Bake

Prep time: 20 min.
Cook time: 20 min.
Total time: 40 min.
Servings: 6-8
This is a delicious casserole, great for a cold night.
Ingredients:
- 8 oz. Deutsche Küche Spaetzle
- 6 slices Grandessa Signature Center Cut Bacon, chopped
- 1 medium onion, diced
- 1 apple, cored, peeled and diced
- 1/2 tsp. Stonemill Essentials Iodized Salt
- 1/2 tsp. Stonemill Essentials Ground Black Pepper
- 16 oz. Deutsche Küche Smoked Bratwurst, sliced*
- 8 oz. Happy Farms Cream Cheese
- 2 cups Deutsche Küche German Style Sauerkraut*
- 6 slices Happy Farms Swiss Cheese, chopped
- Carlini Cooking Spray
- 4 tbsp. Countryside Creamery Unsalted Butter
- Preheat oven to 350°.
- Bring 4 quarts of water to boil in a large pot. Lightly boil the Spätzle for 10-12 minutes, drain and reserve.
- In a medium frying pan, sauté bacon until crisp. Remove with a slotted spoon and drain on paper towels. Reserve. Add onion, apple, salt and pepper to pan drippings. Sauté for 4-5 minutes. Add bratwurst and cook for an additional 5-8 minutes or until heated through.
- Lower heat, add cream cheese and reserved bacon to the pan. Continue stirring until cream cheese is blended. Remove from heat and stir in sauerkraut, Swiss cheese and spaetzle.
- Coat a 9 x 12 pan with cooking spray. Add mixture to pan, top with pats of butter.
- Bake covered, for 15 minutes or until cheese is bubbly.
ALDI Test Kitchen
(Recipe for Spätzle will follow!)
Backwards Smores

Prep time: 22 minutes
Cook time: 28 minutes
Total time: 50 minutes
Yields: 18 mini squares
Ingredients:
ALDI Test Kitchen
Cook time: 28 minutes
Total time: 50 minutes
Yields: 18 mini squares
Ingredients:
- 1 box Baker's Corner Brownie Mix
- 2 Goldhen Eggs
- 2/3 cup Carlini Vegetable Oil
- 1/4 cup water
- 4 cups Baker's Corner Miniature Marshmallows
- Three 1/2-rectangles of Benton's Honey Graham Crackers
- Preheat oven to 350°. Spray two 8 x 8-in. pans with non-stick spray and line with wax paper.
- Stir together the brownie mix, egg, vegetable oil and water until well blended.
- Spread half of the brownie mix into each 8 x 8-in. pan. Bake for 18 minutes.
- Remove the brownies from the oven and allow them to cool for 5 minutes.
- Top one of the brownies with 2 cups of marshmallows.
- Follow with a single layer of graham crackers.
- Follow with the remaining 2 cups of marshmallows.
- Finally, flip the remaining brownie onto the layered brownie. Remove the wax paper from the bottom. Foil wrap the top and bake for 10 minutes to soften the marshmallows.
- Remove the layered brownie from the oven, lightly press down on the foil to help the marshmallows stick to each layer. Allow to cool down for 5 minutes.
- Remove the layered brownie from the pan and cut into 18 mini squares.
ALDI Test Kitchen
Sunday, September 09, 2012
Arms length
Can you measure your height by measuring the length of your arms and hands being spread out straight?
You will find that it's pretty close.
Have someone measure you from your longest finger of one hand all the way across to the longest finger of your other hand, you will find that the measurement is (pretty close) the same as your height.

Now quit making fun of my stick people!
Is it the correct shoe size?
Have you ever been shoe shopping and either didn't feel like trying on a shoe or didn't have socks on and really didn't want to use the store supplied funny socks/cut up penny hoses?
I know I have done that several times. Most of the time I am wearing socks and tennis shoes and it just happens to be that I see a really cute dress shoe but I can't try it on because we all know that socks and dress shoes just don't go together.
Here's an easy trick on how to avoid having to try on shoes.
Your foot foot and your forearm are the same length!
Seriously! Don't believe me?
Put your foot up on top of your forearm. See, it's true!
Now try the same thing with your shoe.
Ha, told you so!
Does the sock fit?
You may think I am crazy but this is true, it really works!
 Did you know that you can measure if a sock fits you by using the sock from heel to toe as your measure? (I did!)
Place the heel of one sock at the thumb and wrap it around the fist from thumb to other side so the toe comes around to the thumb again.
If the toe doesn't quite reach the heel; the socks are too small.
If the toe goes over and past the heel; the socks are too big.
if the toe touches the heel or over a little bit the socks will fit. BUY THEM.
So next time you buy socks and you can't try them on, you can use this technique to find out if the sock fits you or not.
Saturday, September 08, 2012
Melted Crayon Art
Somebody who I know did an awesome canvas with melted crayons so I thought, "Hey, why not, I can do this!".
I was hoping a for a little more splatter but it till came out pretty good.
For the melting part, make sure you take this project outside. If not, you really want to cover your area with newspaper. This (can) will get messy.

Hot glue green (various shades of green) crayons onto any canvas of your size.
With your crayons on top, use your hairdryer (or heat gun) on it's highest setting. Hold your hairdryer close to your crayons until they start to melt and run down your canvas.
Turn your canvas over (crayons are now on the bottom), hot glue some flowers and gems to it.
Voila! Melted Crayon Flower Art.
This one was done the same way but with various blues. The little kid and duck were cut out on my Cricut Machine.

"Finger Food"
Another (gross) Halloween Food idea (from superhealthykids.com)
 Big fat Pretzel rod
Wrapped a piece of lean ham around it.
For the fingernails, stick a sliced almond in the end of it.
*************************************************************************************
Hot Dog Mummies


Wrapped a piece of lean ham around it.
For the fingernails, stick a sliced almond in the end of it.
*************************************************************************************
Hot Dog Mummies

Ingredients:
 Cheese Broom Sticks:
- Pillsbury or store-brand dough or crescent rolls
- hot dogs
- mustard or ketchup for eyes
1. Pre-heat oven to 400°
2.Cut the dough into strips and wrap the hot dogs into mummies.
3. Bake for 15 minutes at 400°
4. Add mustard or ketchup dots for eyes.
Tip: You could cut the hot dogs in half for mini
mummies.
*****************************************************************
mummies.
*****************************************************************
Cheese Broom Sticks:
What do you need?
- 12 Slices of Cheese
- 12 Snacks sticks
- 12 Fresh Chive
- 12 Slices of Cheese
- 12 Snacks sticks
- 12 Fresh Chive
How do you do it?
1.- Fold each cheese slice and cut the fringes of the broom using a pair of scissors.
2.- Roll the slice of cheese around a snack stick having the fringes looking down.
3.- Finally to keep the cheese around the stick, use some chive and knot it around.
1.- Fold each cheese slice and cut the fringes of the broom using a pair of scissors.
2.- Roll the slice of cheese around a snack stick having the fringes looking down.
3.- Finally to keep the cheese around the stick, use some chive and knot it around.
Subscribe to:
Posts (Atom)